
Veiiko by Hansedelli
It’s available on the designer’s website, as a PDF only.

Veiiko really looked different. I had never encountered a sewing pattern for such a bag.
The various pictures on the website didn’t show ALL of the OPTIONS available.
The booklet has 140 pages full of pictures for each step (no diagram, but the choice of contrasting fabrics makes it easy to undertsand the steps), various combinations of pockets, thousands of pictures, etc.
When you open the file, you’re 😯 .
Before buying, you can have a look of how the booklet is set up.

Once bought, read the whole instructions 5 or 6 times. i’m not kidding, it’s packed with information. And grab a notebook as well!
Let’s talk about the bag itself. It’s a backpack with foam pads almost everywhere to make for a very comfy bag to carry.
It has a main compartment and you can add a laptop compartment if you wish (max. 14″).
And it has POCKETS. All types of pockets:
- bottle pocket
- strap pocket
- front pocket
- back/side pockets
- passport pocket
- mesh pockets….

Poche à bouteille
So, if you’re keen on pockets (and sewing zippers), you’ll be delighted.
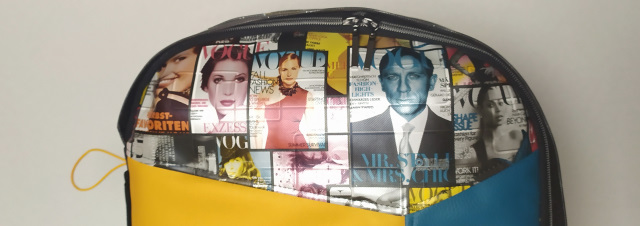
Here’s one of the inside panels: 4 pockets and a pen holder.

Many clever details are present like these tiny spaces to hide the D-rings when not using the back straps.


LOTS of notions and fabric
You won’t be able to skip a trip or two to the DIY store (or on the Internet!).
 My advice would be to print the cutting chart and the pattern pieces diagram. Then, underline what you have cut because you have about 200 pieces to cut…
What’s in the basket were my interfaced pieces. It helped me have things a bit organized.
There’s a very handy and graphic Notions list in the instructions (it’s available on her website):

If you want to use various colors, you’ll need to knwo what goes where. Even doing a mock-up assembly, I managed to get one of my directional fabric piece upside down (it’s at the bottom of the bag, no big deal…well, it is a big deal, but…)
Many interfacings are compulsory.

Le dos: similis, toile, mousse, sangle, etc
This bag can be extremely expensive in terms of notions, hardware, fabrics, etc.
So I opted to use most of my stash to minimize the cost.
Fabrics
Any type of fabric can be used. However, for the outer shell, I would recommend water-repellent fabrics and/or sturdy fabrics or use some Odicoat* on it.

BEWARE of the layers: some places have 8 layers of fabric/interfacings. That means that your sewing machine must be able to get through all of them when topstitching.

The last sewing step was binding the inner seams…Let’s say that a few choice words were uttered and I did my work-out session for the day!
All of the fabrics were remnants or from projects I had ultimately discarded.
 For instance, the black faux leather is from my son’s Wayfarer bag.
The printed Vogue fabric dates from when I started sewing, 15 years ago. I bought a yard of it to sew…a Kindle jacket!!! Then the glittery simili was used on my daughter’s Jalie Galaxie bag.
Interfacings
This fabric requires a ton of different interfacings. It’s a soft bag. Do not expect a sturdy little case.
Depending on your choice of fabric and what you have at home, you can manage to minimize the cost on interfacing. I’ll deal with that in my next article.
Harware and notions
I had to order and it took me ages to decide on the colors of the zippers, the types of sliders, etc.

I ordered mainly from Snaply. They have an amazing range of products:
Voici ce que j’y ai pris:
- pack (strap/rings, etc)
- flat elastic
- round elastic
- zipper by the meter (comes with sliders)
- nicer sliders (for the outer zippers)
- mesh
- stoppers
- binding
- large strap
- D-rings
- lobster clasps
- velcro
- sliding rings
